Hello students,
For those of you who have signed up for my online advanced portrait drawing master class, below is a brief outline of what will be covered in each class as well as a list of materials. For those of you who are interested in signing up for this class, you will find a link on my website, http://www.riverafinearts.com under my “art classes” page.
First, I’d just like to express how truly thrilled I am to finally be offering one of the most extensive portrait drawing classes online. This class goes well beyond the basics. In addition to learning about the underlying anatomical structures which make up the human face, you will become more skilled in rendering subtle nuances of form, value and texture, which will give your portraits that incredibly life-like appearance that will leave your viewers in awe. If you took my portrait drawing I master class prior to this, you will already be familiar with a lot of the terminology discussed in this course.
1st Class
We will begin with a discussion of the materials, followed by a linear construct from a photograph of our portrait model using comparative measuring. The initial construction will focus on accurately deciphering large shapes with a series of vertical, horizontal and angled lines. This type of construction helps us to understand the width to height ratios of our subject as well as the big relationships. I will discuss and demonstrate this method in a real time video. As we begin to refine our contour lines, we will look for the curves and irregularities within the large forms. We will also tackle the linear construction of the interior forms (including shadow shapes) using the same method.
2nd Class
In the second class, we will discuss the importance of value as it relates to our subject. I will then give a four part demonstration.
Part 1.
I will start off by discussing how to create an extended value scale. Working with different mediums allows us to increase our value range as each medium has it’s own inherent value.
Part 2.
Next, I will render a simple form with a combination of the different charcoals and pencils to push the light and dark value range further. I will explain ways to transition the mediums together to avoid choppiness or overly abrupt changes within the form description.
Part 3.
I will then create a “value study” of the model, focusing on the big shifts of light and dark, as well as the value emphasis which will strengthen the overall composition. This can often be done as a study for a larger image. The idea here, is to simplify the values into large graphic shapes like a posterized picture.
Part 4.
Finally, we will add a light layer of unified value to the actual drawing, creating a one to one ratio of light to dark. This will set up a strong foundation which we will refine and develop with additional layers.
3rd Class
Now we will begin to push our value range within a small area using the “window shading” technique. As I study my subject, I will explain how to work on layering darker values over the shadows, and gradually move towards the lights. This method will allow us to depict the subtleties of each form, and bring it close to completion before moving on to another area. I will break down the underlying anatomy and structure specific to each part with separate studies of the skull.
4th Class
I will continue to develop my shading with a narrated demonstration. My primary focus at this stage is to accentuate the forms and anatomical structures of the model’s features. In so doing, I will begin to transform the drawing into a life-like portrayal of human expression. I will also begin to talk more specifically about how certain muscles of the face form actual expressions.
5th Class
This is where all of the parts start coming together and the drawing slowly takes on a life of it’s own. As I continue to render the model’s features, I will be honing in on the subtleties which are specific to capturing her unique likeness.
6th Class
In this final class I will demonstrate how to push the “hyperrealism” to the next level by adding skin texture, individual strands of hair, etc. This is the layer where we transform the sculptural form which we’ve spent so many hours refining, and add, yet another layer of textural detail. As we do this, we will also re-evaluate all of the parts, making sure that our values work as a whole.
(Below is a short clip of me demonstrating how to shade light values with a hard pencil – one of the many things which will be covered in this course.)
Recommended materials:
1.) Drawing pencils (I recommend the Faber-Castell brand) in the following hardnesses;
(4H, 2H, B, 2B, 4B)
2.) Nitram charcoal sticks (H, HB, B, 2B)
3.) General’s charcoal pencils (HB, 2B, 4B)
4.) Kneaded eraser
5.) Double sided shaders in assorted sizes
6.) A small, stiff bristled blending brush
7.) Razor blades or x-acto knife
8.) A sandpaper block as pictured above
9.) BFK Rives white drawing paper (15 x 22)
10.) Strathmore Bristol medium texture drawing paper (11 x 14 or larger)
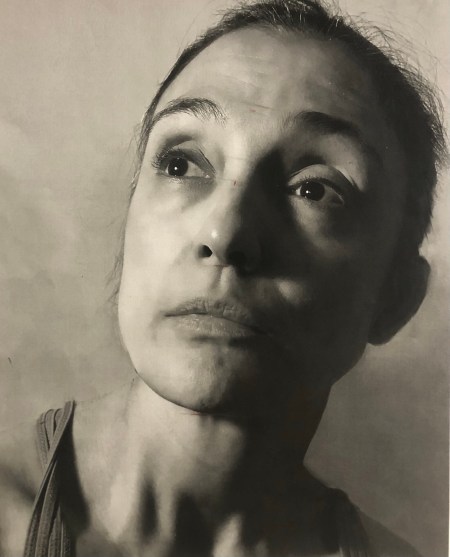
Reference photo below:
If you have any questions about the materials or anything else, don’t hesitate to email me at riverafinearts@gmail.com.
